Clearance: Half Off

Closeup view of a wheel spacer installed

In the spirit of Black Friday, I’ll offer you another story in the continuing saga of getting the Bobcat ready for Winter.

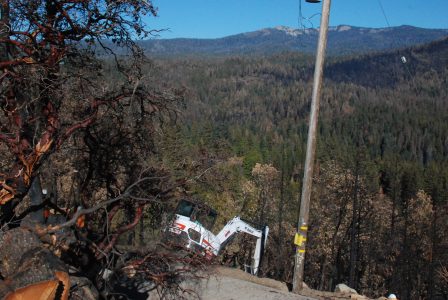
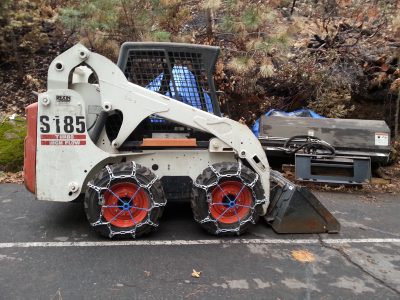
On a recent trip up one of the things we brought along was a shiny new set of tire chains.  The possibility of snow had been in the forecast and it is much more pleasant to install chains before the snow falls, when it is still relatively warm and dry outside.  So our plan was to get the chains mounted onto the Bobcat’s tires prior to the incoming storm.

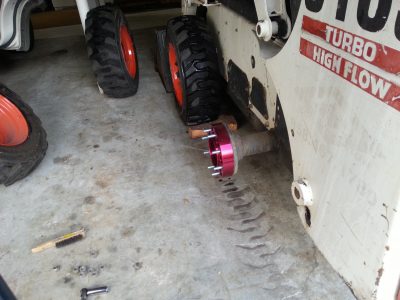
That plan was thwarted when I saw that the clearance between the tires and the Bobcat’s frame was too narrow — by at least a half of an inch.

Rut roh.  No chains installed on this visit!

Back home I researched my options.  Some Bobcat wheel rims are fancy enough that you can mount them “inside out” (actually by swapping the left side tire with the right side, so that the tread still faces forward) and thereby get yourself a bit more clearance.  But back home now, I couldn’t tell whether or not my rims were the fancy type, so I couldn’t count on that as an option.

Of course I could buy new rims with greater clearance (assuming they could be found) , or the fancy reversible ones, and swap my tires onto those.  Either of those two options was expensive and difficult to do, unless maybe you happen to own a tire store right next to your Bobcat. Not my first choice.

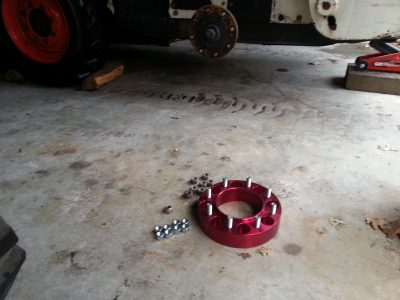
Another option was to install “wheel spacers,” metal rings that mount between the axle and the rim. Seems like these metal rings are not available in any thickness other than two inches.  These are specifically designed for use with OTT (“over the tire”) tank-type tracks, which apparently need at least two inches of extra clearance between tire and frame.

Tracks are great for muddy construction sites.  But they don’t grip very well on ice; chains are much more effective for that. So I won’t be adding tracks to my Bobcat anytime soon.  Two inches of additional clearance was far more than the half-inch I needed, but “more than enough” is not a problem in this case.  The wider stance actually makes the Bobcat a bit more stable.

Plus, adding spacers was guaranteed to give me the clearance I needed regardless of whether or not my rims were already the fancy reversible kind.  So spacers were the lowest-risk, least expensive solution that would guarantee me the clearance I needed.

So spacers it was.  Cast iron spacers are more common (and slightly cheaper) but they weigh more than 20 lbs each.  That’s 80+ lbs of shipping weight alone.  Spacers were also available in anodized aluminum at roughly 1/4 the weight and only about $10 more per spacer.  They also don’t rust.  That all sounded worth $40 to me.

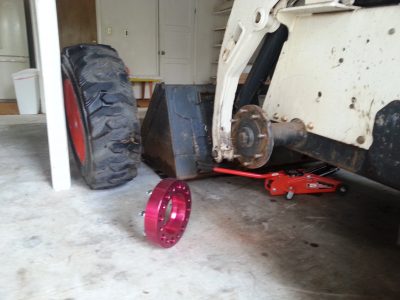
Installation was pretty straightforward.  There was a bit of a risk that my puny two-ton hydraulic jack would not be up to the task, but it came through (just barely).

Image of a Bobcat skidsteer with rear wheel removed
Two-ton jack lifting at its limit, and rear wheel removed
Image of a red aluminum wheel spacer next to the Bobcat
The snazzy bright-red-anodized wheel spacer is ready to install
Image of wheel spacer installed on the axle
Rear wheel spacer installed and lug nuts property torqued

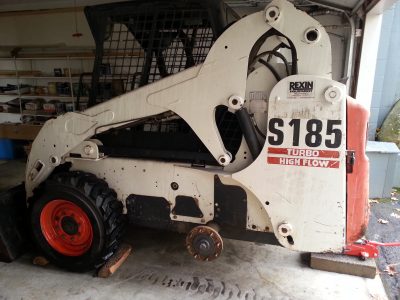
The front of the Bobcat was considerably lighter than the rear so jacking that up was a breeze.  Of course I could have used the Bobcat’s own arm hydraulics to lift the front tires off the floor instead of using the jack.  But I didn’t want to risk the possibility of a slow leak in the hydraulics complicating the process, and the jack was easy enough to use anyway.

Image of wheel spacer and front axle of the Bobcat
Front of Bobcat lifted and wheel spacer ready to install

The whole process took me approximately 2 hours start to finish.

Image of Bobcat with tire chains installed
All four tire chains now installed with plenty of clearance!

While I was working on the Bobcat I also added a much-needed rearview mirror.  The old 843 we lost in the fire had a mirror, which frankly I didn’t think I used that much. But the new S185 came without one, and I’ve noticed how much I really did miss it.

Image of the rear view mirror from the operator's perspective
A Bobcat-style selfie

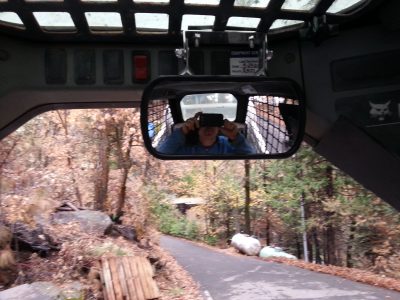
Skidsteers are very easy to learn to drive, but what can take practice is learning how to not hit things that you don’t want to damage.  There’s so much weight and hydraulic power behind that weight that you often can’t even feel a collision when it happens.  The mirror helps prevent it from occurring in the first place.

Still Not Quite Ready

Since about mid-October the Bobcat has been beeping 3 times when you first start it, and flashing a glowplug warning light.  After you start it though the warning goes away so I hadn’t been too concerned about it.  Seemed like it might just be telling me that it was using the glowplugs to help start.

But on this last visit the morning was cold (low temps in the 40s) and the Bobcat took several tries to start.  This concerned me since it is absolutely essential that the Bobcat starts reliably in snowy conditions.

Time for more research.

It turns out that the warning is telling me that the diesel engine’s glowplugs are not working correctly.  Diesel engines only need them for cold starts so that explains why the warning only appeared recently (Fall temperatures), and only on the first start of the day.  Either one or more of the glowplugs themselves are bad, or the electrical system supplying them has a problem.

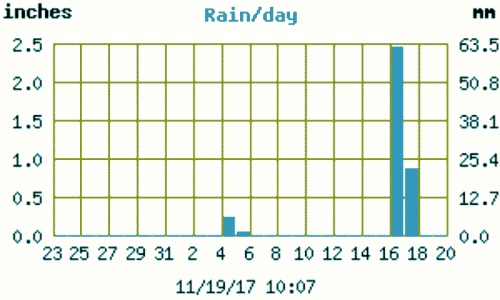
I can’t determine  which one it is  until our next visit.  There is some rain in the forecast for next week, but fortunately not snow (yet).

Weather: we like it! (Or not.)

The view north towards Raymond Mountain on the morning after more than 3 inches of rain fell overnight

At the end of my November 2nd post I mentioned that I was hoping that the demolition/cleanup contractors would finish soon, because there was rain & possibly snow in the forecast.  Well fortunately they did (finish), and there wasn’t (snow).

We received about a third of an inch of rain in that storm, which was good! It was enough to nourish the landscape but not enough to create troublesome mud and debris flows.

Image of a chart of rainfall showing 3.3. inches overnight
This is a graph of total rainfall at our weather station up the road in Fish Camp: 3.3 inches overnight!

This past week we had a second storm come through, with much more rain.

This storm was typical of what weather folks call an “atmospheric river” or more colloquially as the “Pineapple Express.”

These are weather systems where a cold, low pressure air mass from the north drops down and meets a warm high pressure airmass from further south off the coast of California or Mexico. The counterclockwise rotation of the low pairs with the clockwise rotation of the high below it to pump a narrow stream of tropical moisture from the mid-Pacific (roughly  near Hawaii) directly into California.  Depending on the temperatures involved and the time of year, large amounts of moisture can fall on the high Sierras as either rain or snow.

Thank goodness this storm was early in the season and too warm for snow at our elevation of 5000 ft. That much precipitation could easily have been as much as 3 feet  of snow, and our Bobcat skidsteer wasn’t quite ready for snow yet (more on that issue in a following post).

That said, 3+ inches of rain is still a lot of rain.  Mud flows clogged the culverts under Highway 41 all the way from south of the Westfall Fire Station up to Fish Camp.

Even the 12 inch diameter culvert that runs under the first turn of our driveway had been overwhelmed by a mass of black, gooey mud.  When I arrived the tiny creek that normally flows through the culvert was no longer tiny, and no longer going under the driveway, but rather down it instead.

The forecast called for temperatures to dip below freezing by Friday night.  If I wasn’t able to unplug that culvert before then the water now streaming down the driveway could easily freeze and turn much of that portion into an ice rink.

This could easily have been a major, unexpected headache. But fortunately by probing the muck with a 4 foot piece of lumber for about 15 minutes, I was able to find the mouth of the culvert, poke through the mud and restart the flow.  After that the water itself did the rest of the work, flushing the entire area around the mouth of the culvert clean of the remaining gook.

The rest of the property survived the storm pretty well.  For instance, after the demolition & cleanup was finished we had used a small excavator to widen and level the driveway shoulder in several places.

Image of a Bobcat mini excavator in a widened shoulder of the driveway
This new turnout is about 50 ft above the Trestlewood Chalet

I hope to be able to use the new turnout above as an alternative place to store the Bobcat and its attachments, one that is out of the way of Trestlewood Chalet guests.

Image of exacator on a newly-created flat space
Eventually we’ll use this newly leveled spot  inside the highest switchback as a place to store logs.

These newly-cleared areas, as well as the former Logger’s Retreat breezeway itself, were at risk of being washed out by the rain.  We had tried to minimize that risk before the storm and the results were encouraging.

Image of a small amount of mud flowing across the driveway
Silt fencing did a pretty good job of holding most of the mud in place.
Image of driveway with more mud across it
There was more erosion at the top switchback, but still it was manageable
Image of another muddied part of the driveway
This mud above the top switchback actually had nothing to do with our grading work.  It all came down from the fire road above

We were particularly worried about the former breezeway area since the recently disturbed soil there was soft and there was no longer any cinder block wall to stop mud from flowing over the edge.    But some careful placement of boulders at the edge and the construction of a small berm were enough to keep the water flowing in the right direction and erosion to a minimum.

Image of the Logger's Retreat site with small erosion channels cut into the dirt
This is how the former breezeway looks after more than 3 inches of rain overnight. Not bad!
(And We Do Like It)

Of course we would have preferred a slower, more gentle rain.  Yet despite the real risks that a deluge poses, the storm’s aftermath Friday morning was stunningly beautiful — just as it often had been on Fall mornings prior to the fire.  In the crisp early morning air, fingers of low clouds and fog clung to the forested hills across the valley.

Soon enough the sun broke through, quickly burning off much of those clouds but also warming the ground, which caused new misty wisps of fog to rise up and drift across the blackened landscape.

As I went about my tasks I  paused often to savor the cold morning air and the sharp visual contrasts of bright blue and white sky against a sparkling forest of wet beige and black trees.

Mornings like this are one of the things we’ve always loved about the Logger’s Retreat. And although most of the trees and all of the structures on our property are now gone, I find it comforting to see that this place still delivers its special magic to anyone here who is willing take a moment to appreciate it.

Survey Says!

Early in this whole rebuilding process, I knew we would need to know exactly where our property lines were.

Image of Jones Snyder & Associates contact information
The surveyor’s contact information. These guys are great!

In the 3rd week of September I contacted Jones Snyder & Assoc by email to schedule an appointment.  Nick told me they would need about a month’s lead time to do the survey, which was fine.  I gave them the go-ahead.

By late October I still hadn’t seen or heard from Nick, and had noticed that I could really use those boundary stakes.  I had talked with several contractors using approximates, but we really needed exact on-the-ground locations before they could start doing any serious clearing or grading work.

I checked in with Jones & Snyder again to see where we were in their schedule. They said they would be on site the next Monday. By the following Friday (November 3rd) we had our stakes in the ground and a large set of digital files available in a Dropbox folder.  Perfect!

An unexpected bonus was that they had recently (2016?) acquired an Unmanned Aerial Vehicle (i.e. a “drone”).  They had used it to accurately photograph the landscape from above and then included the full, high-resolution (146 Megabytes at 1 pixel per inch) TIFF image along with their survey drawing.

Image of a surveyor controlling a drone flying a short distance away
One of the surveyors playing with their new UAV (photo by Jones & Snyder, from their website)

Coming from surveyors of course, the image from the drone is an orthographic projection — meaning that the image will accurately map onto 2 dimensional drawings. As an example of how useful this is, they also included a lower resolution version of the image combined with the survey drawing in a convenient PDF format (this file is only 3.8 Mbytes).

I’ve now imported both the boundary drawing as well as the drone image as separate layers into my AutoCad drawings of the property.  This allows me to easily view or hide the orthographic image as I experiment in AutoCad with structure or landscape modifications.  It is immensely helpful for adding that extra bit of “ground truth” to any wild idea I may get.

But what is also notable to me about the drone image is how clearly it shows the contrast between the areas that burned and those that did not.  You can see exactly how the fire narrowly avoided the Trestlewood Chalet and our neighbor’s house to the north, and yet totally engulfed the area surrounding the Logger’s Retreat.  Even in the low-resolution PDF image you can still clearly see the driveway, downed trees, newly-exposed boulders and the barren fire-swept hillsides.  In the middle of it all, below the bare spot where the house once stood, there is the old picnic area with its fire ring and picnic table, essentially untouched by the inferno that had surrounded them.

Count me as a satisfied customer. Now I’m wondering what it would cost to have Jones & Snyder come out again, just to take an updated drone image (or two).  Stay tuned!


Cleaning (up) House – Part 2

Some of the tools that DKI used to tackle the mess that was the Logger's Retreat
Breaking Up is Hard to Do

I was next able to visit the property in late October.  The optimism we enjoyed from seeing the start of cleanup had been tempered a bit by the fact that we had no visual progress updates since the last visit.  So I found myself anticipating this visit in part just to be able to get another dopamine boost.

About a third of an inch of rain had fallen at the end of the previous week. It was obviously welcome relief to the parched landscape, but had interrupted DKI’s schedule. They did not work on site that Friday as they were worried about the possibility of snow on the steep driveway.  They seemed to be taking longer than planned and this had only delayed them further.

Image of driveway surrounded by many fallen trees
This is what the driveway now looks like from the top of the steepest section

Still, by the time I arrived they had finished removing most of the debris. They were now focused on removing the concrete foundations and dead trees surrounding the house and garage.

Image of clean concrete slab
The pump house and water tank slab are now cleared of all debris

Though they were technically a bit behind schedule, their efforts were notable both for the good progress they had made, and for how they made difficult work look pretty easy.

Image of foundation wall with clean dirt at its base
The foundation wall is now all that is left of the house itself. The former entrance to the house is at top left, and the oak tree on the right is the one that was right next to the lower deck

For instance, to clear the area below the foundation wall (where the house itself once stood) required two excavators; one below the wall to remove material, and another above, on the driveway itself, to dispose of it.  Getting that lower excavator into position required navigating some pretty steep terrain.

Image of the driveway edge with steep dropoff for a shoulder
This steep slope is the “road” the excavator had to navigate (in reverse) in order to go from the work site back onto the driveway

Shortly after I arrived they were done using the lower excavator, so they needed to get it back up onto the driveway.  The terrain is too steep to drive up normally, as you might with a car for example.

Image of excavator backing up a very steep slope
If you’ve ever worked with equipment like this you know how tricky this maneuver is.

Instead you have to approach the slope backwards, and simultaneously use the shovel as both a crutch (for stability) and as a foot (to push the excavator up slope).  Without that extra push the excavator’s tracks just grind their way into the dirt and you go nowhere.  Lose the extra stability provided by the crutch and you risk rolling the (several ton) excavator over, on a steep hillside no less.  This is not a job for the feint of heart!

Meanwhile, on the driveway itself, DKI used the heavy equipment to collect and then dispose of the foundation rubble.  As I know from my experience with the Bobcat skidsteer, it is easy to take for granted the power available in those hydraulic cylinders.

Image of a pile of large boulder-size rocks and concrete chunks
Some of the rocks and broken concrete DKI collected to haul away

Imagine trying to move even one of those boulders by hand.  Or the tree trunks below.  With only manual labor it would have taken many hands, and many weeks.

Image of a pile of tree trunks and branches
They collected tree trunks and “slash” in another pile nearby

Here’s another example of the power behind those hydraulics.  That crumpled piece of metal below is actually the quarter-inch-thick steel door of the old Bobcat’s engine compartment.

Image of debris including a crumpled heavy steel door
The heavy steel rear door of the Bobcat, crumpled almost as if made of aluminum foil

Despite the power in these mechanical beasts of burden, they do still have their limits.  DKI’s foreman told me that he had to dismantle the burned-out hulk of our old Bobcat because it was just too heavy to lift in one piece.  That is why he had removed the steel door.

Image of rusted diesel engine block on pavement
The Bobcat’s diesel engine lies alone on the ground, bent and partially dismantled

For the same reason I found the Bobcat’s diesel engine lying on the pavement, all alone and partially dismantled.

Closeup image of a diesel engine partially dissasembled
A closeup of the underside of the Bobcat engine, showing the exposed crankshaft and piston rods

While the engineer in me found the exposed innards very interesting, it was also a bit sad to see the engine like this.  Prior to the fire it had been fully functional and running strong, providing the very same kind of power that DKI was now using to dispose of it.

Goodbyes Are Hard Too

Despite the welcome morale boost each step in the cleanup has given us, there is (for me at least) still a quiet but persistent sadness present whenever I visit.  I feel a nagging sense of loss here; the loss of something that can never be replaced, never undone.

I feel it acutely every time I see a new tree stump appear where a familiar tree once stood.  On a practical level I know the trees have to come down. They are dead (or nearly so). They can never again be the healthy green towers of shade that they once were. It was only a short few months ago that the landscape was crowded with them.  Now the few that remain standing are coming down too.

Image of driveway and oak tree with mountains in the background
A late afternoon overview of the driveway from above, with the oak tree still standing

Though I know it cannot be so, a big part of me still wants to believe that if only I let them remain standing they would bud again next Spring.  It hurts to see each one of these old friends come down.

Image of driveway and stump from above with mountains in background
Another overview of the driveway on the following day, with the big oak tree now lying on the pavement below
Image of felled trees lying across a rocky pathway
Nearly all of the trees that were above the path to the picnic area are now lying across it, or gone altogether
Image of foundation wall, dirt and felled oak tree
That oak tree that was next to the lower deck is now down too.

The feeling of loss is not confined to those majestic old trees either.  Familiar aspects of the house and property are now also gone forever, or disappearing with each day of the demolition.

Image of a clean but soot-stained cinderblock wall
On the day I arrived, the shop wall where the wood stove once stood was nearly all that was left of the garage
Image of a hillside with tree stump and cinderblock rubble below
And by the end of the following day the wall itself was down; the big oak tree above it reduced to a stump. Its branches are visible in the foreground
Image of bent metal tubes next to a pile large boulders
The garage and shop support posts which survived the fire have now joined the pile of concrete and boulders, awaiting their trip to the landfill.

One final task during my visit was to empty the 20 foot storage container behind the house.  Although it survived the fire, thick smoke found its way into the interior, covering everything inside with a heavy layer of jet-black soot.

Image of a metal storage container surrounded by charred trees
The blackened storage container is surrounded by dead trees, including a massive, broken old oak tree directly behind it

It had been mostly empty already except for some sturdy metal shelves, extra skid-steer tire chains and a few other parts for the old Bobcat.

Image of the sooty insides of the storage container
The inside of the container was not damaged by heat, but completely covered with soot

I pulled those things out of the container and stacked them beside the few items we’d salvaged from the garage’s shop area.

Image of several metal objects in front of a blackened metal storage container
The salvaged wood stove and shop workbench now stand in front of the storage container, along with some of the container’s metal shelving

After the container was empty I secured a plastic tarp over the items outside, in a feeble attempt to protect them from the long winter ahead.

The container itself will probably be one of the last things that DKI removes from the property.  Even though we really didn’t use it for the last 10 years, it will still make me sad to see it go. Kinda like the trees I guess.

Come to think of it, we didn’t really “use” most of those trees on the property either.  Yet like good friends they were always there for us.

That Reminds Me

As I started down the driveway on my way back home, this colorful Dogwood reminded me that Winter is just around the corner.

Image of a small Dogwood with bright yellow and orange leaves
A young Dogwood in front of the Trestlewood Chalet is putting on a Fall show

And sure enough, I see that there is more rain and possibly even snow in the forecast for this weekend, the first weekend of November.

That forecast has me worrying about the driveway again.  I sure hope DKI is finished by Friday!